


3.
Working with Projects
This chapter introduces the CodeWarrior IDE Project window and shows how to create, configure, and work with projects.
A project contains one or more build targets. Each build target in a project contains a collection of files that the IDE uses to build an output file. Build targets within a project may share some or all of their files. Some examples of an output file include an application, static library, or dynamic library.
Each build target within a project has its own options that customize how the IDE builds the output file. There are a wide variety of options that control code optimization, browsing, debugging, compiler warnings, and much more.
Finally, build targets within a project can be configured to depend on other build targets in the project. This feature makes it possible to build software that, for example, combines the output files for different platform targets into a single output file.
This chapter discusses many of the basic tasks involving projects, such as creating projects, opening projects, adding files, and saving projects. It also describes advanced operations such as moving files in the Project window, marking files for debugging, creating nested projects and build targets, and dividing the Project window into groups of files.
The topics in this chapter are:
Guided Tour of the Project Window

The Project window shows information about the various files and build targets in a project file. The Project window uses four different views: the Files view, Design view, Link Order view (sometimes called Segments view or Overlays view), and Targets view. To choose a view, click its tab at the top of the Project window, as shown in Figure 3.1.
Figure 3.1 View tabs at the top of the Project window

The Files view shows a list of all the files in a project. Items in this view may be organized into hierarchical groups that you create and arrange.
The Design view shows the rapid application development (RAD) designs in the project.
The Link Order view (sometimes called Segments view or Overlays view) shows information about how the IDE will compile or link the final output file for the project's current build target.
The Targets view shows information about the active build target, build targets associated with RAD designs, build target dependencies, and link-compatible build targets.
The topics that explain the Project window in detail are:
To learn more about debugging information, see "Controlling Debugging in a Project" on page 103.
Navigating the Project Window

To navigate the Project window, use the vertical scroll bar on the right side of the window, or the Up and Down Arrow keys on your keyboard. If the Project window contains many files, use the Home key to jump to the first file in the first segment or group, or use the End key to jump to the last file in the last segment or group.
Use the Page Up and Page Down keys to scroll one page up or one page down the Project window.
To learn about a technique for selecting files as you type, refer to "Selection by keyboard" on page 77.
Project Window Toolbar

The toolbar in the Project window has buttons and other items to provide shortcuts to commands and information about the project. You can choose the items to display on the toolbar, and the order in which those items are displayed. You can even choose to hide or display the toolbar itself. To learn more about toolbars in the CodeWarrior IDE and how to configure them, refer to "Customizing the IDE" on page 289.
Files View

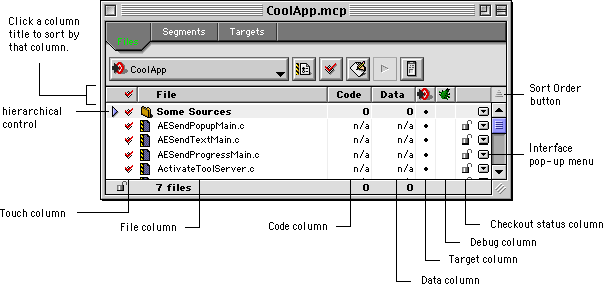
The Project window's Files view shows the files for all build targets in the project. The files can be arranged into hierarchical groups without affecting the way the IDE handles a build target. This view also shows information about modification status, file access paths, code size, data size, current build target, debugging status, and other information.
The following topics describe the parts of the Files view:
File column
The File column lists a project's files and groups in a user-configurable hierarchical view. A group may contain files and other groups.
Double-clicking a file's name in the File column will open that file. For information on opening files from the File column, refer to "Opening Files from the Project Window" on page 110.
Use the hierarchical control to display and hide the contents of groups in the File column.
Figure 3.2 Project window
To see the path along which the IDE accesses a file:
Windows
Right-click the file's name in the Project window, then choose Open in Windows Explorer from the pop-up menu.
Mac OS
Control-click the file's name in the Project window, then choose File Path from the pop-up menu.
Solaris
Click and hold on the file's name in the Project window, then choose File Path from the pop-up menu.
For information on opening files from the File column, refer to "Opening Files from the Project Window" on page 110.
Code column
The Code column shows the size, in bytes or kilobytes, of the compiled executable object code for files and groups. If "0" is displayed in the Code column, it means that your file has not yet been compiled. If "n/a" is displayed, the file has no executable code that was compiled by the IDE, or the file is not in the current build target.
The values in this column do not reflect the amount of object code that will be added to the final output file. The linker may not use all of a file's object code when creating the final output. Instead, the linker may ignore data and code that other files in the project do not reference (known as "deadstripping" code).
For more information on how the linker works, see "Compiling and Linking a Project" on page 357.
Data column
The Data column shows the size, in bytes or kilobytes, of non-executable data in the object code for files in the project. A "0" in the Data column means that your file has not yet been compiled, or that the file does not contain a data section in its object code. If "n/a" is displayed, the file has no object code data.
Like the Code column, the data values in the Data column do not reflect the amount of data that will be added to the final output file.
The displayed numeric values are only for items in the current build target. Values for items not in the current build target are displayed in gray.
For more information on how the linker works, see "Compiling and Linking a Project" on page 357.
Debug column
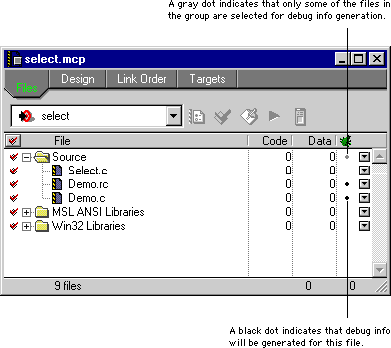
The Debug column indicates whether debugging information will be generated for the files in the project. A black marker in this column means that the IDE will generate debugging information for the corresponding item. A gray marker indicates that the IDE will generate debugging information for only some of the files in the group.
To generate debugging information for a:
To learn more about file debugging information, see "Activating Debugging for a File" on page 103.
Target column
The Target column indicates whether an item is in the project's current build target. The IDE displays this column if a project has more than one build target. A dark marker in this column means that the corresponding item is in the current build target. A gray marker indicates that only some of the files in that group are in the current build target.
To assign or unassign a current build target for a:
For information on adding or removing a file to or from a build target using the Target column, see "Assigning Files to Build Targets" on page 97.
Touch column
The Touch column indicates whether a file needs to be compiled the next time a target is built. A marker in this column means that the corresponding item will be re-compiled for the next Bring Up To Date, Make, Run, or Debug command. A gray marker indicates that only some of the files in that group are set for re-compiling.
To enable or disable re-compiling for a:
To learn more about this feature, see "Synchronizing modification dates" on page 90.
Sorting items
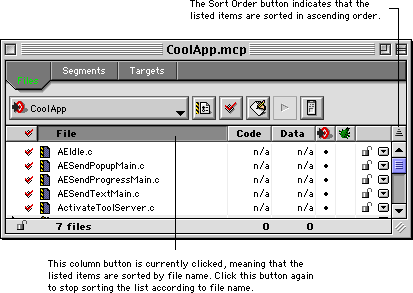
You can sort the items listed in the Files view of the Project window. The title of each column behaves like a button. Click a particular column button to sort the listed items according to that column's title. The button is displayed differently from the other buttons to indicate that it is currently active. Click the column button a second time to stop sorting the items according to that column's title.
For example, clicking the File button as shown in Figure 3.3 sorts the listed items alphabetically by file name. Clicking the button again stops sorting according to file name criteria. Note that you can sort the items only one column at a time.
To change the sort order, click the Sort Order button:
 Items are currently sorted in ascending order.
 Items are currently sorted in descending order.
Figure 3.3 Sorting listed items in the Files view
Interface pop-up menu
The Interface pop-up menu lists and opens interface and header files for your project source files. This pop-up menu also lets you touch or untouch the selected item and set other options. The additional options depend on the current build target.
For groups, the Interface pop-up menu lists the files within the group. Choosing a file in the pop-up menu will open that file.
For more information about opening interface and header files, see "Interfaces pop-up menu" on page 112.
File Control pop-up menu
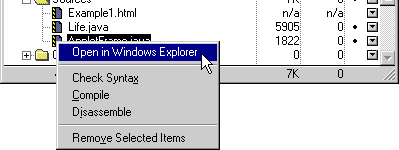
The File Control pop-up menu is shown in Figure 3.4. To display this pop-up menu:
Windows
Right-click an item's icon in the Project window.
Mac OS
Control-click an item's icon in the Project window.
Solaris
Click and hold on an item's icon in the Project window.
From the File Control pop-up menu, you can choose a command to operate on the item. The available commands depend on the selected item. The following examples show some of the pop-up menu commands:
Windows
To see the path along which the IDE accesses a file, select Open in Windows Explorer from the pop-up menu.
Mac OS
To see the path along which the IDE accesses a file, highlight File Path in the pop-up menu. To view the file and its enclosing folder from the Finder, select Reveal in Finder from the pop-up menu.
Figure 3.4 File Control pop-up menu in the Project window
Checkout Status column
The Checkout Status column indicates whether files are checked in or checked out of a version control system (VCS). Use this column to track changes to your code, particularly when more than one person is working on your software project. The Checkout Status column, shown in Figure 3.2 on page 45, only appears when you configure your CodeWarrior project to use a source code revision control system. For more information about using a particular revision control system, refer to its documentation.
Project Checkout Status icon
The Project Checkout Status icon shows whether a project is writable, as well as the file access permissions for that project. A revision control system assigns these permissions when you check in or check out a project file.
To learn more about the Project Checkout Status icon and how the icon relates to the access permissions assigned to your source code files, refer to "Getting a File's Status" on page 593. To learn more about using your particular revision control system, refer to its documentation.
Design View

The Design view shows the rapid application development (RAD) designs in your project. This view shows the objects that belong to particular designs and the names of those objects. The Design view is a convenient starting point for inspecting object names, properties, and design hierarchies.
When your project includes RAD designs, you can use the Project window's Targets view to see the hierarchy of designs and build targets for the entire project. A single project file lets you manage multiple designs. Within each design, you can specify multiple build targets.
For more information about RAD designs, refer to "RAD Designs and Layouts" on page 493.
Link Order View

The CodeWarrior IDE compiles a project's files in the order shown in the Link Order view. This view is useful for explicitly specifying a custom build order. For example, if one file depends on information from a second file that has not been compiled yet, the IDE might fail to compile the project. You can avoid this problem by changing the ordering of the files in the Link Order view.
Changing the order of files in the Link Order view affects the final binary code produced by your project file. Note that items in the Link Order view can only be nested one level deep.
For more information, see "Setting Link Order" on page 359. For more discussion about groups, refer to "Managing Files in a Project" on page 74.
Mac OS
The Link Order view might be named Segments for some build targets. Refer to "Targeting Documentation" on page 27 for more information.
Embedded
The Link Order view might be named Overlays for some build targets. Refer to "Targeting Documentation" on page 27 for more information.
Targets View

The Targets view shows a list of the build targets in the project. This view also shows the objects that the build targets depend on to create a final output file. Figure 3.5 shows an example Targets view.
Figure 3.5 Targets view in the Project window
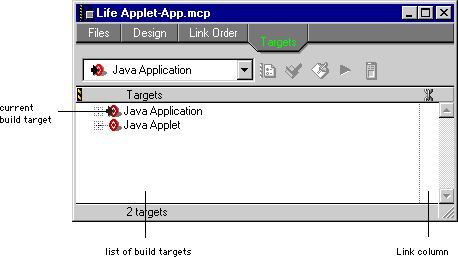
If your project includes RAD designs, the Targets view shows the hierarchy of build targets within each design. For more information on working with build targets, see "Working with Complex Projects" on page 90. To learn more about designs, see "RAD Designs and Layouts" on page 493.
Creating a New Project

Creating a new CodeWarrior project file involves the following concepts:
Types of Project Files

CodeWarrior uses these types of files to create new projects:
The rest of this section discusses creating new projects using project stationery. For more detailed information, see "Working with Project Stationery" on page 59.
 NOTE
NOTE
Advanced users who are interested in using empty projects should read "Configuring Target Options" on page 315. That chapter provides information about configuring compiler and linker settings for use with projects.
Choosing a Project Stationery File

To use a project stationery file to create a new project, choose
Figure 3.6 New window (Windows)
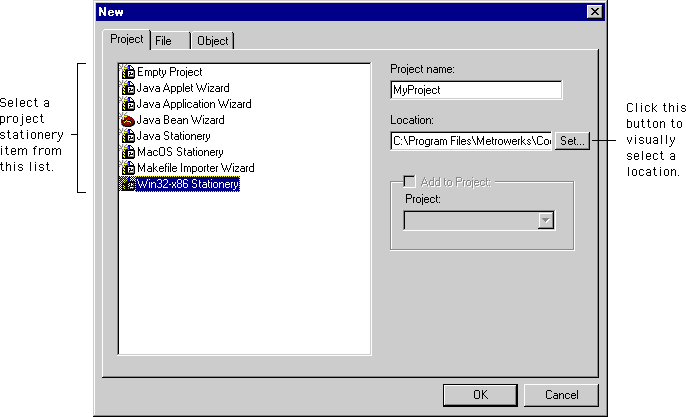
Click the Project tab at the top of the New window to display the Project panel. The items listed in the Project panel represent various types of project files. To create new projects from stationery, you progress through a hierarchy of choices. First, you choose stationery for a particular platform target, such as Windows or Mac OS. Next, you specify a specific operating system, language, or programming framework. After you choose these more general options, you can choose from several pre-configured project stationery files.
When you select an item in the Project panel list, various options become available along the right side of the panel.
To create a new project from stationery, select a file with "Stationery" in its name from the list shown in the Project panel. For example, if you want to create a project for the Mac OS platform, select the MacOS Stationery item in the list.
Figure 3.7 New window (Mac OS)
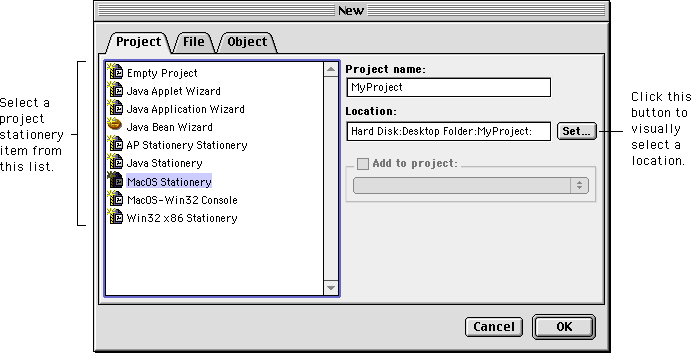
To create an empty project that has no libraries or other support files, select the Empty Project item in the Project panel list.
For beginners
Selecting Empty Project is not recommended because of the complexities of including the correct libraries and files and choosing the correct target settings. Instead of creating an empty project, use CodeWarrior's project stationery files. These files are pre-configured and convenient to use.
Naming Your New Project

After choosing New from the File Menu and selecting an item in the Project tab of the New window, type a name for the new project in the Project Name field.
 TIP
TIP
We suggest naming your project file with a .mcp file name extension, like this: MyProject.mcp. This naming convention helps you quickly identify the project file on your hard disk. In addition, the Windows-hosted version of the CodeWarrior IDE uses this extension to identify the project file.
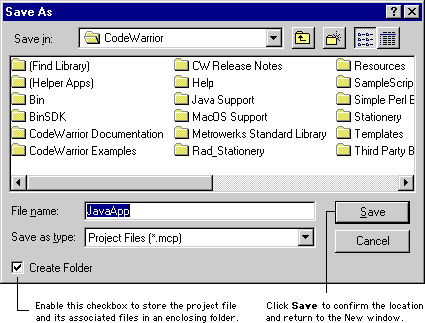
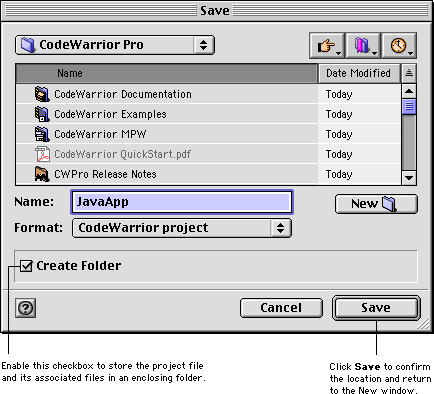
The Location field displays the full path to the folder in which the project is saved. To change the current path, type a new path directly into the field. Alternatively, click the Set button to display a dialog box, which is shown in Figure 3.8 (Windows) and Figure 3.9 (Mac OS). Use the dialog box controls to navigate to a location on your hard disk where you want to save the project. To create a new folder to contain the project file and all of its associated files, enable the Create Folder checkbox. Then click Save to confirm the location and return to the New window.
After entering a name for the new project and specifying a location in which to save that project, click OK in the New window. The IDE displays the New Project dialog box.
Figure 3.8 Save dialog box (Windows)
 WARNING!
If you try to save the new project, and you already have an existing project with the same name in the same location on the hard disk, the IDE displays an error message. Be sure to use a unique name for your new project.
Figure 3.9 Save dialog box (Mac OS)
Using the New Project dialog box

The New Project dialog box, shown in Figure 3.10, presents a hierarchy of project stationery based on your choice from the New window. For example, if you selected the Win32-x86 Stationery item in the New window, the New Project dialog box shows a hierarchy of project stationery for the Windows platform.
Figure 3.10 New Project dialog box
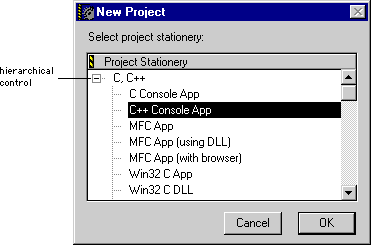
The topmost level of the hierarchy shows the languages or programming frameworks for which project stationery is available. Click the hierarchical control next to the particular language or framework you want to use for your project. Then, browse through the expanded list and select the stationery file representing the type of project you want to create.
When you select a stationery file and click OK, the CodeWarrior IDE automatically sets up the project, including:
For example, suppose you want to create a new project that is geared towards a C++ console application. First, you would click on the hierarchical control next to the C/C++ option in the New Project dialog box. The list expands and shows the project stationery for the C and C++ programming languages. The C++ Console App stationery file provides a simple console-based application structure that is suitable for small non-frameworked programming examples. When you select C++ Console App and click OK, the CodeWarrior IDE creates a new project with all the libraries and support files you need.
Modifying Your New Project

Most new projects created from stationery contain source files that are basically placeholders. You probably want to delete these files and replace them with source files of your own. See the section "Managing Files in a Project" on page 74 to learn more about manipulating files in a project
You might also want to add additional libraries to your project file. To learn about which libraries to include, refer to the Targeting manual of interest to you. See "Targeting Documentation" on page 27 for more information.
Building Your New Project

After you create your project and add your own files to it, you will want to build it to produce your software. To learn how to build a project, refer to "Compiling and Linking" on page 355.
Working with Project Stationery

This section discusses how to create and use project stationery. It includes an explanation of project stationery that you can use to customize the project-creation process described in "Creating a New Project" on page 52.
CodeWarrior projects can be configured to have multiple build targets. In addition, CodeWarrior projects can also contain subprojects. For more information, refer to "Working with Complex Projects" on page 90 after reading this section.
The topics in this section include:
About Project Stationery

A project stationery file is typically a minimal, pre-configured "starter" project file. Think of it as a template, or blank slate, that you use to quickly create a new project. When you create a new project or open a project stationery file, the CodeWarrior IDE creates a new project and, optionally, a new folder for the project. It then copies all the files related to the stationery project to the new folder.
A stationery project includes:
After creating your new project from stationery, you can open that project and begin developing code in the CodeWarrior IDE.
About the Project Stationery Folder

CodeWarrior provides project stationery for many different kinds of projects. Project stationery files for common types of projects are located in folders nested within the project stationery folder.
The following files can be included in the project stationery folder and are recognized by CodeWarrior as stationery projects:
You can find the project stationery folder at the following locations:
Windows
The Stationery folder, inside the CodeWarrior folder on your hard disk, stores project stationery.
Mac OS
The (Project Stationery) folder, inside the Metrowerks CodeWarrior folder on your hard disk, stores project stationery.
Solaris
The (Project Stationery) folder, inside the CodeWarrior folder on your hard disk, stores project stationery.
Creating Your Own Project Stationery

You can create a unique stationery or "template" project file that includes the files and options you want to have for a starter project. This stationery project can be reused whenever you create a new project, so that you always start from your own customized settings.
Any CodeWarrior project can become a stationery project. A project must meet the following conditions to qualify as stationery:
When you choose your project stationery in the New Project dialog box, CodeWarrior duplicates the project and source files associated with the stationery project using the new project name.
For beginners
Before creating your own project stationery, you should become familiar with the project stationery supplied with CodeWarrior. This familiarity helps you understand the importance of the files included with the project stationery.
To create your own custom stationery, follow these steps:
1. Create a new project from an existing project stationery file, or just create an empty project.
2. Choose Save A Copy As from the File menu.
The dialog box shown in Figure 3.11 (Windows), Figure 3.12 (Mac OS), or Figure 3.13 (Solaris) displays.
3. Use the dialog box controls to save the new project to the project stationery folder.
You must create a folder in which to store the new project. The CodeWarrior IDE recognizes a project stationery file by its enclosing folder. If you use the Windows-hosted version of the IDE, make sure that the project file's name includes the .mcp extension.
4. Modify the project's settings to best suit your requirements.
Be sure to add and remove files as necessary to create the exact base project you want.
5. Make sure that copies of all the project's source files are present in that project's folder.
If the source files are not in the folder, those source files will not be copied to any new projects created with the project stationery.
6. Save your changes after you finish modifying the project.
After you save all your changes, the project is ready for use as a new project stationery file.
Figure 3.11 Save A Copy As dialog box (Windows)
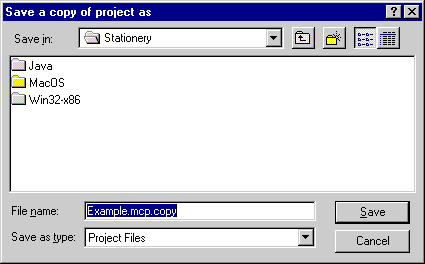
When you save your stationery file in the project stationery folder, you can use that stationery the next time you choose the New command from the File Menu.
When you use your custom project stationery file to create a new project, all of the files associated with your project stationery are copied to the new project's location, ready for modification.
Figure 3.12 Save A Copy As dialog box (Mac OS)
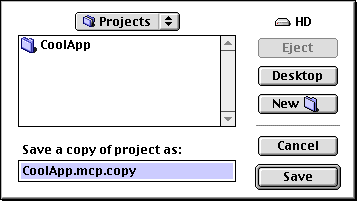
To learn how to configure the Preferences settings in your project stationery, refer to "Choosing Preferences" on page 252. You can customize Target Settings in a similar way. To learn more about how to do this, refer to "Choosing Target Settings" on page 318.
For information about adding or changing files in the project, see "Managing Files in a Project" on page 74.
See "Backing up files" on page 118 for more information about saving a copy of the project under a different name.
Figure 3.13 Save A Copy As dialog box (Solaris)
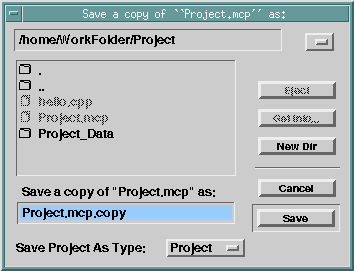
The reason you want to save the stationery project before doing a lot of work with it is because you want to have a "starter" or "template" project file on your hard disk. You can make copies of the "starter" project to get new projects quickly started, with all your favorite settings.
New projects created with your stationery file include all the settings you initially configured for that stationery file.
If at any time you decide that you want to use different project settings for new projects, you can create a new project stationery file. Just make sure that you have the Project window open, configure your options, and save your new project stationery file in the project stationery folder.
Importing Makefiles into Projects (Windows)

The CodeWarrior IDE can import Visual C nmake or GNU make files into CodeWarrior project files. The IDE uses the Makefile Importer wizard to process the files. This wizard performs the following tasks:
This section discusses the following topics:
Using the Makefile Importer Wizard
Makefile Importer Options
Using the Makefile Importer Wizard

To create a new project from a makefile, choose New from the Project menu. The IDE displays the New window, shown in Figure 3.6 on page 54. Click the Project tab in the New window to display the Project tab, then select Makefile Importer Wizard in the list.
Next, follow the conventions for naming the new project and saving it to a particular location. These conventions are described in "Naming Your New Project" on page 55.
When you finish naming the project and choosing a location in which to save it, click OK in the New window. The IDE displays the Makefile Importer wizard. See "Makefile Importer Options" on page 65 for more information about configuring the options in the wizard.
Makefile Importer Options

The Makefile Importer wizard, shown in Figure 3.14, presents several options that help you customize the conversion process. These options include:
After configuring these options as desired, click Finish. The Makefile Importer wizard presents a summary window. This window shows the current conversion settings. Click Generate to import the makefile according to these settings, or click Cancel to return to the wizard and make additional changes.
Figure 3.14 Makefile Importer wizard
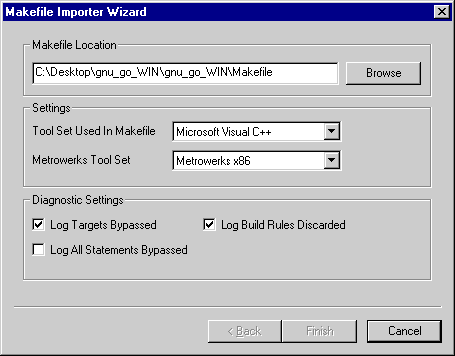
Makefile Location
This field is where you type the location of the makefile you want to import into a CodeWarrior project file. Alternatively, click the Browse button to display a standard dialog box. Use the dialog box controls to locate the makefile. After you select the makefile in the dialog box, click Open. The path to the makefile is displayed in the Makefile Location field.
Settings
These options determine the tool sets used for the conversion of the makefile and the selection of a linker for the new project file. The options include:
Diagnostic Settings
These checkboxes determine whether message reporting is enabled for various types of information created during the conversion process. The checkboxes are:
The messages are displayed in a Project Messages window after the conversion process concludes. This window is similar to the Message window. For more information, see "Guided Tour of the Message Window" on page 373.
Opening an Existing Project

There are several ways to open a project file from within the CodeWarrior IDE. This section tells you how to open your projects so you can work on them.
Note that you can have many different projects open at a time, not just one project. See "Choosing a Default Project" on page 73 for more information on default projects.
You can make an open Project window the active window by using the Window Menu. To switch to one of several opened projects, just choose the project's name from the Window menu.
The topics in this section are:
Using the Open Command

To open a project file, choose the Open command from the File Menu. The IDE displays an Open File dialog box, as shown in Figure 4.1 on page 109 (Windows), Figure 4.2 on page 110 (Mac OS), and Figure 4.3 on page 110 (Solaris).
Windows
If not already set, use the Files of Type pop-up menu to select Project Files. The file list changes to show the project files that you can open.
Select the project file you would like to open, then click Open. The CodeWarrior IDE opens the project and displays it in a Project window.
If the project was created with an older version of CodeWarrior, you will be prompted to convert the older project to the newest version. If you decide to update, CodeWarrior saves a backup of the project and then converts the project to the newest version. See "Opening Project Files from Earlier IDE Versions" on page 70 for more information.
To learn more about working with CodeWarrior project files, see "Working with Projects" on page 41.
Using the Open Recent Command

The CodeWarrior IDE maintains a list of the projects and files you have opened recently in the File Menu. As a convenience, you may use the Open Recent menu command to reopen one of these projects.
To learn about setting the number of files that the IDE remembers in this menu, see "IDE Extras" on page 254.
Using the Project Window to Open Subprojects

If your project contains subprojects, and you want to open one of those subprojects, double-click the subproject file's icon in the Project window. The IDE displays the subproject in a new Project window.
To learn more about subprojects, and how to add them to your Project window, refer to "Working with Complex Projects" on page 90.
Opening Project Files Created on Other Host Platforms

Project files are cross-platform compatible. For example, a project created on a Macintosh computer may be opened and used on a Windows computer.
To use a project created on another host platform, copy only its project file, not its associated Data folder, from the other host platform to your computer. After copying the project, open it in the IDE and recompile its files. Although a project's format is cross-platform compatible, its compiled object code is not.
 NOTE
NOTE
Before copying a project, make sure the project has a ".mcp" file name extension (without the quotes). For example, if the project is currently named MyProject, rename it to MyProject.mcp. The Windows-hosted version of the CodeWarrior IDE uses this file name extension to recognize project files. If the three-letter extension is not present, the Windows IDE cannot identify the project file.
 TIP
TIP
When creating any project, always add the ".mcp" extension to the project file's name. This makes it easy to move project files to a different platform.
See also "Options Pop-Up Menu" on page 138 for information on editing source code files created on other platforms and "Host Flags" on page 327 for information on setting up access paths for a host platform.
Opening Project Files from Earlier IDE Versions

The CodeWarrior IDE version 3.0 and later cannot use a project file from any version of CodeWarrior earlier than 1.7. You must recreate the project file from scratch using the new IDE, or convert the project file to work with the new IDE. This section discusses how you can convert projects.
Converting a single 1.7 project
The CodeWarrior IDE has the ability to convert project files to the newest format from the format used by 1.7 versions of the IDE.
Windows
To convert a single 1.7 project, open it from the latest version of the IDE. The IDE will prompt you to convert the project to the newest format. The name of the converted project file will be based on the name of the original file.
Mac OS
The IDE uses a conversion utility called Project Converter. The name of the converted project file will be based on the name of the original file. Project Converter is located in the Other Metrowerks Tools subfolder of the Metrowerks folder on the hard disk where CodeWarrior is installed. You can convert a single project in either of two ways:
 NOTE
NOTE
1.7.x projects must be converted to the new format if you want to work with them in the latest version of the IDE. The conversion of the project to the newest format is permanent. The latest version of the IDE cannot save a project in 1.7.x format.
Converting multiple 1.7 projects (Mac OS)
Project Converter has the ability to convert multiple 1.7 project files into a series of separate projects under the new format, or into one multi-target project file under the new format.
To use this feature, drag and drop a group of 1.7 project files onto Project Converter. Next, the IDE asks you whether to keep the files as separate projects or merge them into a multi-target project under the new format. Choose the option you wish.
Project Converter will prompt you to select a folder and name for the project or projects.
If you encounter problems, contact support@metrowerks.com.
You should read the Project Converter release notes before converting your projects. The release notes are in the IDE Notes folder, which is inside the CWPro Release Notes folder where CodeWarrior is installed. The release notes give you information on any late-breaking topics regarding the IDE.
Opening project files from versions prior to 1.7 (Mac OS)
Project Converter only converts project files from the 1.7 IDE releases with CodeWarrior 10 and CodeWarrior 11. If you have an earlier project, you must convert it to CW10 or CW11 format before using Project Converter.
To update a project to the 1.7 format, first make certain that the latest version of the IDE is not running. Then launch the 1.7 IDE and open the project.
The 1.7 IDE will update your project. You can then run the updated project through Project Converter to update that project to the newest format.
If you do not have version 1.7 of the IDE, you can find it on the CW Pro Tools CD. Look for the CW11 IDE and Prefs.sit file in the Other Metrowerks Tools folder.
Saving a Project

The CodeWarrior IDE automatically updates and saves your project when you perform certain actions. This section discusses the actions that cause a project file to get saved.
Your settings get saved when you:
You never have to manually save your project unless you want to create a copy of it, since the project is automatically saved when you perform the common actions listed above.
Items Saved with Your Project

When the CodeWarrior IDE automatically saves your project, it saves the following information:
Saving a Copy of Your Project

If you want to save a backup copy of a project file before you make some changes to the original, use the Save A Copy As command in the File Menu. The CodeWarrior IDE creates a copy of the project file under a new name that you specify, but leaves the original project file unchanged. Furthermore, the IDE does not change the currently open project to use the new file name.
 WARNING!
Do not attempt to make a copy of an open project from the desktop. Always close the project before copying the project file to prevent it from being corrupted.
Closing a Project

After you work with your project for a while, you may want to close it to work on another project, or you may want to quit the CodeWarrior IDE application to work on something else.
To close a project, make sure its Project window is frontmost, then choose Close from the File Menu.
You do not have to close your project before quitting the CodeWarrior IDE application, since your project settings are automatically saved. To learn more details about saved projects, refer to "Saving a Project" on page 72.
The CodeWarrior IDE allows you to have more than one project open at a time, so you do not have to close a project before switching to another project. Just open your new project and begin working with it.
 TIP
TIP
Having multiple projects open at a time consumes more memory on your computer, and also causes project opening times to lengthen slightly. Keep these performance issues in mind as you work with multiple projects in the IDE.
Choosing a Default Project

Since the CodeWarrior IDE permits multiple open projects, it is sometimes ambiguous as to which project is used when you perform a
However, source code files can be in more than one open project. You can specify a default project for builds by using the Set Default Project command in the Project Menu. In any ambiguous case, such as when a source code file belongs to more than one open project, the CodeWarrior IDE will operate on the default project you choose with the Set Default Project menu command.
The first project you open becomes the default project. If you close the default project, the default project becomes the project with the frontmost Project window.
Managing Files in a Project

This section discusses adding, moving, naming, organizing, viewing, marking for compilation, and removing files from your project. The topics in this section are:
Expanding and Collapsing Groups

Groups display files in collapsible lists. To expand a group and view its files, click the hierarchical control next to the desired group's name. To close a group and view only its name, click the hierarchical control again.
Figure 3.15 Expanding groups and subgroups
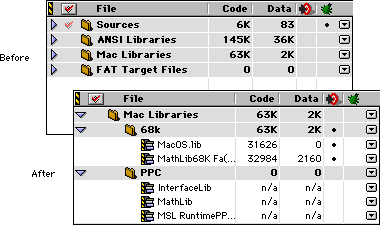
Alt/Option click a group's name to expand that group and all its subgroups in the Project window, as shown in Figure 3.15. Note that other groups at the same level as the chosen group are not expanded. Alt/Option click again to collapse the group.
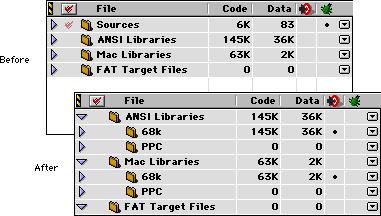
Ctrl/Command click a group's name to expand all groups at the same level in the Project window, as shown in Figure 3.16. Ctrl/Command click again to collapse the sibling groups.
Figure 3.16 Expanding all sibling groups
Selecting Files and Groups

From the Project window, you can select one or more files and groups to open, compile, check syntax, remove from the project, or move to a different group.
Selecting a group includes all of the files in that group, regardless of whether or not those files are visually selected in the Project window.
Selection by mouse-clicking
To select a single file or group in the Project window, click its name.
To select a consecutive list of files or groups, select the first file or group in the list by clicking its name, then Shift-click the last file or group.
Everything between and including the first and last file or group you clicked on will be selected, regardless of whether or not the selected items are groups or file names.
Another way to select a consecutive list of items is to drag-select them, like you would select items on the desktop.
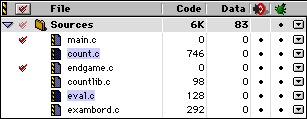
Use Ctrl/Command click to select or deselect any non-consecutive file or group in the Project window, as shown in Figure 3.17.
Figure 3.17 Non-consecutive file selection
Selection by keyboard
To select an using the keyboard, type the first few characters of the name of the item you want to select. As you type, the CodeWarrior IDE selects a file in the Project window as soon as the characters identify the file closest to your entry.
Use the Backspace/Delete key if you make a typo.
Use the Enter/Return key to open a file.
 NOTE
NOTE
Only files in currently expanded groups in the Project window can be selected this way. Files in collapsed groups will not be matched with your keystrokes.
Adding Files

This section tells how to add files to your IDE project.
Here are the topics you will learn about in this section:
When adding a file to a project, the IDE adds the path used to locate that file to the project's Access Paths. The Message window informs you whenever a new access path is added.
 NOTE
NOTE
If you create a project using the Empty Project option, see "Linker" on page 322 and "File Mappings" on page 334. These sections describe how to configure the IDE so that you can add files to your project.
Normally, the IDE forces each file in a project to have a unique name. To remove this restriction, turn on the
See "Access Paths" on page 323 for more information about defining additional paths in your project.
For more information about the Message window, see "Guided Tour of the Message Window" on page 373.
Where added files are displayed
Files are always added after the currently selected item in the Project window, or at the bottom of the Project window if there is nothing selected. To place a new file or group in a particular location, always select the file or group above the desired location before performing the Add Files or Add Window command.
Regardless of whether or not a selected group is expanded or collapsed, the added files are placed at the end of that group. To learn about how to select a file or group of files, see "Selecting Files and Groups" on page 76.
 NOTE
NOTE
If a group or a file within a group is not selected prior to adding files, a new group is created and appended to your project. The added files are placed in this new group.
Of course, you can always move a file or group of files to a new location within the project. To see how to move files and groups around in the Project window, see "Moving Files and Groups" on page 85.
Using the Add Files command
The Add Files command on the Project Menu opens a dialog box you can use to add files to your project. Use this command to add source code files, libraries, resource files, and other files.
In order for files to appear in the Add Files dialog box, the files must have a corresponding mapping as defined in the File Mappings preference panel. To examine and configure possible mappings for file names, refer to "File Mappings" on page 334.
Add Files (Windows)
The Add Files dialog box is shown in Figure 3.18. The Files of Type pop-up menu is initially set to view all file types.
Use the dialog box controls to navigate through folders and drives to find files to add.
To add a single file to your project, select the file in the file list and click Add. Alternatively, you can double-click the file to add it to your project.
Figure 3.18 Adding files to a project (Windows)
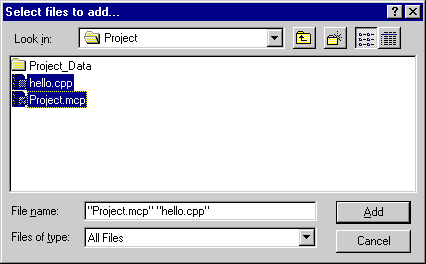
To select multiple files, as shown in Figure 3.18, press the Control key while clicking on the file names in the dialog box.
To select a contiguous group of files, click on the first file name in the group, then press the Shift key and click on the last file in the group.
When you select all the files you want to add, click Add. Note that if your project contains multiple build targets, you will be prompted (Figure 3.21 on page 85) to select the build targets to which you want the files added. There may be a delay while the IDE locates the selected files and adds them to your project.
Clicking Cancel closes the dialog box without adding any files to the project.
Add Files (Mac OS)
The Add Files dialog box is shown in Figure 3.19.
Figure 3.19 Adding files to a project (Mac OS)
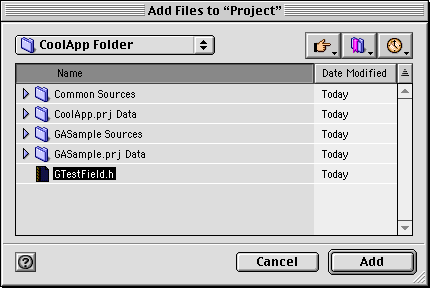
Use the pop-up menu at the top of the file list or the Shortcuts, Favorites, or Recent buttons to navigate through folders and drives to find files to add.
To add a single file to your project, select the file in the file list and click Add. Alternatively, you can double-click the file to add it to your project.
To select multiple files, click the disclosure triangles in the list so that files you wish to add are visible. Shift-click each file name that you want to add to your project. If you change your mind about adding a particular file, Shift-click that file's name to deselect it.
When you select all the files you want to add, click Add. Note that if your project contains multiple build targets, you will be prompted (Figure 3.21 on page 85) to select the build targets to which you want the files added. There may be a delay while the IDE locates the selected files and adds them to your project.
Clicking Cancel closes the dialog box without adding any files to the project.
Add Files (Solaris)
The Add Files dialog box is shown in Figure 3.20. The file path field at the top of the dialog box displays the path to the current directory listing.
Figure 3.20 Adding files to a project (Solaris)
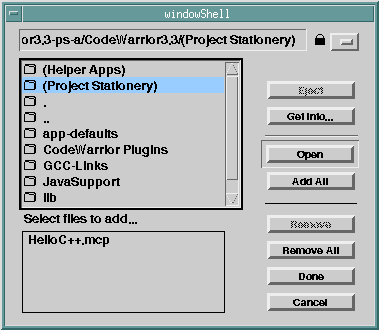
Use the dialog box controls to navigate through folders and drives to find files to add. The Select Files To Add list shows the files you have added to your project
To add a file to your project, select the file in the directory listing and click Add to move that file to the Select Files To Add list. Alternatively, you can double-click the file to move it to the list. Repeat this procedure for each additional file that you wish to add to your project.
To add all the files displayed in the file list to the Select Files To Add list (all available files in the directory), click Add All.
To remove a file from the Select Files To Add list, select the file to be removed and click Remove.
To clear the Select Files To Add list, click Remove All.
When you select all the files you want to add, click Done. The files in the Select Files To Add list are then added to your project. Note that if your project contains multiple build targets, you will be prompted (Figure 3.21 on page 85) to select the build targets to which you want the files added. There may be a delay while the IDE locates the selected files and adds them to your project.
Clicking Cancel closes the dialog box without adding any files to the project.
Using drag and drop
When you drag and drop files or folders onto an open Project window, they will be added to the project.
To add files to your project using this method, first select the files or folders you want to add.
You can select files in many places, including the desktop or the multi-file search list in the CodeWarrior IDE's Find dialog box.
To complete the add operation, drag your selection onto the Project window. Note that if your project contains multiple build targets, you will be prompted to select the build targets to which you want the files added.
When dragging the selected files onto the Project window, the CodeWarrior IDE verifies that the files can be added to the project. When dragging a folder, the CodeWarrior IDE checks to make sure that the folder, or one of its subfolders, contains at least one source code file, library, or resource file, and that file is not already in the project.
If the selection does not contain at least one file recognized by the CodeWarrior IDE, the drag is not accepted.
 NOTE
NOTE
See "Linker" on page 322 and "File Mappings" on page 334 for more information on configuring the IDE to recognize files.
Use the focus bar (an underline) that appears in the Project window to select the location where the files will be inserted.
Releasing the mouse button (dropping the files) adds the dragged items to the project, inserting them below the position specified by the focus bar. If your project contains multiple build targets, you will be prompted (Figure 3.21) to select the build targets to which you want the files added.
To create a new group and add files to it, drop the files when the cursor is over the blank space after the last group.
The CodeWarrior IDE does not allow the dragging of entire volumes (such as your hard disk) onto the Project window.
The IDE allows dragging and dropping outside of the Project window. You can also drag files to another application to open them in that application.
Although the CodeWarrior IDE supports dragging and dropping files into the Project window on all platforms, some platforms do not allow you to remove files by dragging them out of the Project window. To learn how to remove files from the Project window, refer to "Removing Files and Groups" on page 87.
Using the Add Window command
The Add Window command adds the file associated with the active editor window to the project. You typically use this command when you create a new file and decide that you would like to add it to the active project.
To use the Add Window command, select a location in the Project window. Then, open a source code or text file, make sure its editor window is active, and select the Add Window command from the Project Menu. If the window is untitled, the Save As dialog box displays, prompting you to select a location and name for the file. After you save the file, the IDE adds the file to the open project.
Figure 3.21 Add Files dialog box
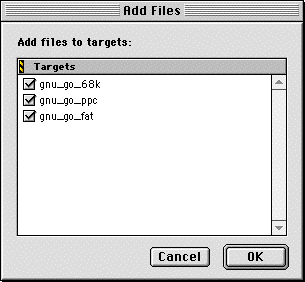
Note that if your project contains multiple build targets, you will be prompted (Figure 3.21) to select the build targets to which you want the files added.
 NOTE
NOTE
The Add Window command is enabled when the active window is a text file, the file is not yet in the project, and the file has a recognized file name extension (to learn about configuring permissible file name extensions, refer to "File Mappings" on page 334). The Add Window command is dimmed otherwise.
Moving Files and Groups

To move one or more files or groups within a project's Files view, or to arrange build targets in a project's Targets view, select the files or groups to be moved. Selecting a group includes all of the files in that group, regardless of whether or not those files are visually selected in the Project window. If you need help selecting files and groups, see "Selecting Files and Groups" on page 76.
Next, drag the selected files or groups to their new location in the Project window.
A focus bar (an underline) indicates where the selected files will be moved when the mouse button is released.
Whether you are moving files or groups depends on your selection. For example, if your selection consists of files, then the focus bar is shown on each line, under both groups and files.
If your selection includes at least one group, then the underline is shown only under other groups as you move the mouse in the Project window, allowing you to rearrange groups.
When the focus bar is displayed at the desired file or group position, release the mouse button. The selected files or groups are moved to the new position.
 TIP
TIP
The focus bar has a small arrow at the left end that indicates the level of insertion into the existing hierarchy. If the arrow is to the left of a group icon, the insertion will be at the same level as the target group. If the arrow appears to the right of the icon, the files are inserted into the target group.
Creating Groups

With the Project window frontmost, and the Files view visible, choose the Create New Group command from the Project menu. Enter a name for the new group in the Create Group dialog box, then click OK. For information on how to change this name, see "Renaming Groups" on page 88.
Mac OS
The new group may use the word "Segment" in place of the word "Group" if the current build target is the 68K microprocessor.
Embedded
The new group may use the word "Overlay" in place of the word "Group."
Removing Files and Groups

You can use menu commands or drag and drop on supported platforms to remove files from a Project window.
Using menu commands
You can remove files from either the Files view or the Link Order view of the Project window. When removing files from the Project window, you need to be aware of a subtle issue. If you remove files from the Files view, they are removed from the entire project, including all build targets. When removing files from the Link Order view (also called the Segments view or Overlays view for some build targets), the files are removed from the current build target.
To learn more about build targets, refer to "What is a Build Target?" on page 91.
To remove one or more files or groups in the Files view, first select the files or groups to be removed. Note that selecting a group includes all of the files in that group, regardless of whether or not those files are visually selected in the Project window.
To learn how to select files, refer to "Selecting Files and Groups" on page 76.
After selecting the files or groups in the Files view, choose the Remove Selected Items command from the Project Menu or press Ctrl/Command-Delete. All the selected files and groups are removed from the project.
 WARNING!
The Remove Selected Items command cannot be undone. If you mistakenly remove a group, you must re-add its files using either the Add Window or Add Files commands from the Project Menu.
Using drag and drop
The CodeWarrior IDE supports dragging and dropping files into the Project window, although you cannot drag files out of the Project window on some platforms.
Renaming Groups

To rename a group, select the group by clicking on it, then press the Enter/Return key. You can also use the arrow keys to navigate to the group, and then press the Enter/Return key. The Rename Group dialog box displays (Figure 3.22). The Enter Group Name field shows the current name.
Figure 3.22 Changing a group name
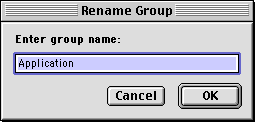
Type the new name in the Enter Group Name field and click OK. The name of the group is changed in the Project window.
If you selected more than one group, the Rename Group dialog box displays multiple times, once for each group. Each time, the Enter Group Name field displays the current name of the group.
Mac OS
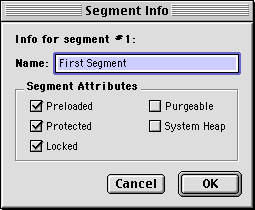
On Mac OS 68K build targets, the Segment Info dialog box shown in Figure 3.23 displays. This dialog box contains a series of checkboxes that affect segment loader information. The Mac OS 68K linker gives the name displayed in the Name field to the code segment when building the project. See the Targeting Mac OS manual for more information on using segments.
Figure 3.23 Changing a segment name
Touching and Untouching Files

Use the Touch column shown in Figure 3.2 on page 45 to mark files that need compilation. The CodeWarrior IDE does not always recognize file changes and may not automatically recompile all files in certain cases, which is why the Touch column features are useful.
There are three possible ways to make sure files get compiled:
 TIP
TIP
If the file has not changed since it was last compiled, the first command in the Interface pop-up menu is Touch. When you choose the Touch command, the CodeWarrior IDE compiles the file the next time it makes your project. If the file has been changed since it was last compiled, the Untouch command is shown.
To unmark files so that they are not compiled, click again in the Touch column left of the file name, or choose Untouch from the Interface pop-up menu.
Note that clicking the check icon at the top of the Touch column touches all files in the entire project.
Synchronizing modification dates
To update the modification dates stored in your project file, click the check icon at the top of the Touch column. Alternatively, choose the Synchronize Modification Dates command in the Project Menu.
After you choose the Synchronize Modification Dates command, the CodeWarrior IDE checks the modification date for each file in the project. If the file has been modified since it was last compiled, the IDE marks it for recompilation. This will resynchronize the state of the files in the project depending on the dates they were last modified. This is useful if the files have been modified outside of the CodeWarrior IDE, perhaps by a third-party editor that does not notify the CodeWarrior IDE when it modifies a file.
 NOTE
NOTE
(Mac OS) Some third-party editors use AppleEvents to let the CodeWarrior IDE know when you modify a file. These editors include BBEdit from BareBones Software, Object Master, and Alpha. You do not need to use the Synchronize Modification Dates command if you use one of these external editors.
Working with Complex Projects

The CodeWarrior IDE provides flexible facilities for creating project files that use sophisticated build rules. This section discusses how to construct complex project files that may contain other projects or different kinds of build target code. This facility allows you to create powerful build hierarchies for your entire software project.
For example, you can set up a complex project that contains build targets for both shipping and debugging versions of your software. By switching between these build targets, the IDE generates different versions of the software during the development process. Each of these build targets can have its own settings. For example, the debugging build target could have optimizations disabled and debugging information enabled, while the shipping build target could have code optimizations enabled.
The topics in this section are:
What is a Build Target?

A build target is a set of rules and settings that you configure to produce a an output file, such as an application or library.
The CodeWarrior IDE has the capability to build many different kinds of output files, or build targets, from one project file, as shown in Figure 3.5 on page 52. For example, you can manage two separate build targets in a single project, one for debugging purposes, and a separate one for your shipping code.
You can also define a specific build order for the various build targets in a project, so that the IDE builds a particular build target before trying to build another. This is useful for sharing resource files between other build targets. You can create a build target that depends on some other build target, forcing the IDE to first build the latter build target.
Each build target in the project can have its own distinct set of build settings.
To learn more about considerations for using build targets, refer to "Targeting Documentation" on page 27 and "Strategy for Creating Complex Projects" on page 94.
What is a Subproject?

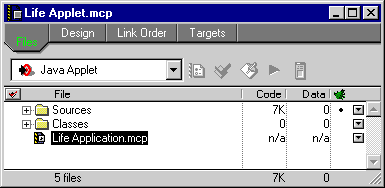
A subproject is a normal, stand-alone project file that can be nested within another project file, like the project named Life Application.mcp shown in Figure 3.24. Subprojects are useful if you have a project file that you want to keep separate from the main project file. This allows you to organize the build process into separate project files.
Figure 3.24 Subproject within a project
One case where this organization might be useful is for developing applications that use a plug-in architecture. Suppose your program uses many different plug-in modules, each sharing some common source code with other plug-ins. You might create one project file to build all the plug-ins by creating a separate build target for each plug-in. In this scenario, the project file for the plug-ins is the subproject. Including the subproject in the project file of the main application causes the IDE to build the subproject before building the main project.
A project file may be assigned to any build target in a project. To learn how to do this, refer to "Assigning Files to Build Targets" on page 97.
To learn how to add files to a project, refer to "Adding Files" on page 77.
You can instruct the CodeWarrior IDE to build one or more build targets in a subproject when it builds the containing build target in the main project. When the IDE builds a build target in the main project, it first builds any selected build targets in any of the subprojects.
You can optionally link the output of the main project with the output of the subproject's build target. To create this link, select the marker for the build target in the Link column of the main project's Targets view. For information on the Link column, see "Targets View" on page 51.
A subproject's build targets are not built automatically when a subproject is added to a parent project. Only the chosen build targets within the subproject will be built.
Subprojects can be made specific to a build target. That is, if you add a subproject, you can choose which build targets it belongs to. Other build targets in the main project will not build the subproject unless the subproject file is added to the build target you choose.
What is a Design?

A design is a collection of components, layouts, and objects for rapid application development (RAD).
Each design in your project can have distinct sets of build targets. As you add source files to a design, those files are automatically added to the build targets in the design.
To learn more about CodeWarrior's RAD features, refer to "RAD Designs and Layouts" on page 493.
Strategy for Creating Complex Projects

The choice of whether to use multiple build targets or subprojects within a project file depends on what works best for you. If you want access to all the source code in one project, then using multiple build targets is a good choice. Subprojects are better when you prefer to keep separate stand-alone project files.
For example, if you need to build a number of plug-in libraries that accompany your application, create a project that builds the subprojects with a single Make command. Then, include this project file as a subproject in your main application project file. When the IDE builds your main application, the subproject's plug-ins will be built first.
There is a limit of 255 build targets per project. Before you hit that limit, you should consider available memory and project load times. Projects with several build targets take up more disk space, take longer to load, and use more memory.
Once you get past ten or twenty build targets, you can improve performance by moving some of them off to subprojects. Anything that is not built often and uses a distinct set of source files is a good candidate for moving to a subproject.
Creating a New Build Target

To create a new build target in your project, use the Create New Target command in the Project Menu. This command displays if you have the Targets view selected in your Project window, as shown in Figure 3.5 on page 52.
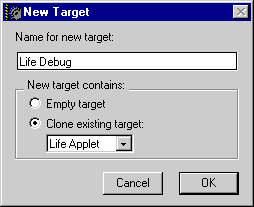
After you choose the Create New Target command, you see the dialog box as shown in Figure 3.25. In this dialog box, you can enter the name of the new build target in the Name For New Target field.
Next, choose whether you want your new build target to be an empty build target or a clone of a previous build target. If you choose Empty Target, you need to configure all the settings of the build target as if a new Project window had just opened. If you choose Clone Existing Target, the settings for the new build target are copied from the build target displayed in the pop-up menu. You also get a copy of all the files that the original build target contains.
After creating a build target, you may want to associate that build target with other build targets. This association creates dependent build relationships. To learn how to do this, refer to "Creating Build Target Dependencies" on page 97.
Figure 3.25 New Target dialog box
To learn how to configure settings for a build target, refer to "Choosing Target Settings" on page 318.
When creating a new build target that depends an output file from another build target, you will need to click in the Link column next to the build target that creates the output file.
Changing a Build Target Name

To change the name of a build target in the Targets view of the Project window, double-click the name of the build target. The IDE opens the Target Settings window for that build target, as shown in Figure 9.4 on page 321. Select the Target Settings panel from the list of available panels. Change the name of the build target using the Target Name field.
You can also open the Target Settings window by choosing the Target Settings command from the Edit menu. The actual name of the Target Settings command will include the name of the current build target.
To learn more about the Target Settings panel, refer to "Target Settings" on page 321.
Changing the Build Target Settings

Each build target in a project has its own settings. You modify these settings through the Target Settings window.
To open the Target Settings window for a particular build target in your project, double-click the name of the build target in the Targets view of the Project window or choose the Target Settings command from the Edit menu. The actual name of the Target Settings command will include the name of the current build target.
The left side of the Target Settings window contains a list of all the appropriate settings panels for the current build target. Select a panel to see the options you can set.
To learn how to change generic settings, refer to "Configuring Target Options" on page 315. Settings panels that are specific to a particular platform target are described in a corresponding Targeting manual, such as Targeting Windows or Targeting Mac OS.
Setting the Current Build Target

You can change the currently active build target in a project by choosing the Set Default Target command from the Project Menu. This command is useful if you want to switch between multiple build targets in a project and do a build for each of those build targets.
You can also change the current build target by using the Targets view of the Project window, as shown in Figure 3.5 on page 52. The current build targets that the IDE will build are denoted by a circular icon (an archery "target") with an arrow going into it. Click once on the name of a build target to choose it as the current build target.
Creating Build Target Dependencies

You can configure a build target to depend on other build targets. These dependencies are useful when you want to ensure that the IDE builds certain build targets before others. For example, you could have a build target that depends on information in a second build target. In order to compile correctly, the IDE must build the second build target before the first build target.
To specify that a build target depends on a second build target, first go to the Targets view of the Project window. Drag the second build target below and indented to the right of the first build target's entry. The IDE adds an italicized entry within the first build target's group for the second build target. This entry makes the first build target dependent upon the presence of the second build target. Now, the IDE will build the second build target before attempting to build the first build target.
To specify that the first build target should be linked with object code from the second build target, click the marker in the Link column of the second target's italicized entry, within the first build target's entry.
If you do not know how to create new build targets, refer to "Creating a New Build Target" on page 94.
Refer to "Setting the Current Build Target" on page 96 to learn how to set the current build target.
To learn more strategies for setting up complex projects with build targets and subprojects, refer to "Strategy for Creating Complex Projects" on page 94.
Assigning Files to Build Targets

You can assign files to a project's various build targets using either the Target column in the Project window's Files view or the Project Inspector.
Using the Target column
The Target column in the Project window's Files view indicates whether a file is in the current build target. The IDE displays this column only if the project has more than one build target. If a file is in the project's current build target, that file has a marker in the Target column.
To assign a file to the active build target, click in the file's Target column to place a marker. To remove a file from the active build target, click the file's marker in the Target column.
To assign or remove all of the current build target's files, Alt/Option click in the Target column to display or erase markers.
Using the Project Inspector
You can use the Project Inspector window to assign a file to various build targets. To use the Project Inspector, you must select a file in the Project window. To learn how to do this, refer to "Selecting Files and Groups" on page 76. After you select a file, choose the Project Inspector command from the Window Menu. The IDE displays the Project Inspector window, as shown in Figure 3.27.
Click the Targets tab to switch the view to that shown in Figure 3.28 on page 101. This window shows you the build targets that your selected file belongs to. Check the checkbox next to a build target to include the file in that build target. Uncheck the checkbox to exclude the file from that build target.
If you make changes that you want to undo, click Revert. If you want to apply your changes and keep the Project Inspector window open, click Save.
Creating Subprojects Within Projects

To create a subproject, drag and drop a project file into an open Project window. Note that if your project contains multiple build targets, you will be prompted (Figure 3.21 on page 85) to select the build targets to which you want the files added. After you do this, the Project window will look similar to Figure 3.26, with a project file added to the list of files in your project. You can also add the file using the methods discussed in "Adding Files" on page 77.
The subproject becomes a part of the main project file. When you perform a Make on the main project, the IDE builds the subproject first.
Figure 3.26 Subproject within a project
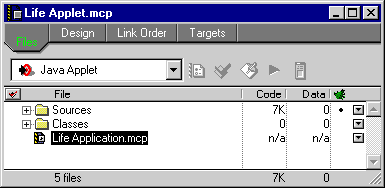
When you add a subproject to a project file, you can assign build targets to that subproject. To learn how to do this, refer to "Assigning Files to Build Targets" on page 97.
Examining Project Information

The CodeWarrior IDE lets you review and configure information about your project and source code files in the Project Inspector window, shown in Figure 3.27. To display this window, choose the Project Inspector command from the Window Menu.
The Project Inspector window includes an Attributes view and Targets view.
To learn how to inspect and set files to compile with specific build targets, refer to "Assigning Files to Build Targets" on page 97.
Figure 3.27 Project Inspector window for attributes
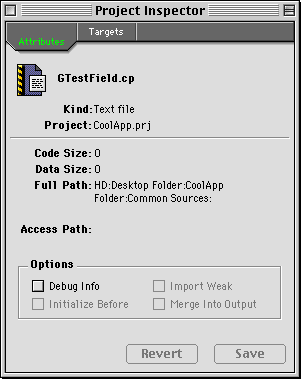
To learn more about a given file in your project, use the Project Inspector's Attributes view. A file's attributes include its name, its path to a location on your hard disk, the name of the project it belongs to, its code and data size (if it has been compiled), and whether or not the IDE generates its Debug Info when compiling the project.
Figure 3.28 Project Inspector window for build targets
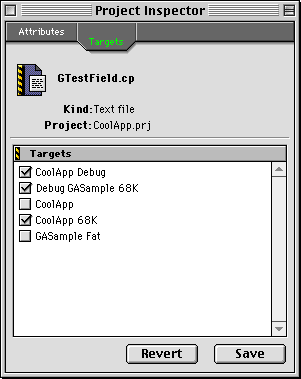
If you decide to undo the changes you make to a file's attributes, click Revert. If you want to apply your changes and keep the Project Inspector window open, click Save.
To learn about configuring Debug Info for files, refer to "Controlling Debugging in a Project" on page 103.
Mac OS
To learn more about setting Initialize Before, Merge Into Output, and Import Weak, refer to "Special Library Options (Mac OS)" on page 385.
Moving a Project

The CodeWarrior IDE stores all required information about your project in the project file. There are other files, usually stored in a folder having a name similar to your project file, that contain information about window positions, object code, debug info, browser data, and other settings. The CodeWarrior IDE does not need these additional files to recreate your project.
 WARNING!
(Windows) Previous versions of the Windows-hosted CodeWarrior IDE used a folder called Resource.frk to store state information for the project file. Resource.frk is now obsolete and will no longer be generated or utilized by the CodeWarrior IDE.
To move the project on your hard disk, copy the project file (ending in .mcp if it obeys the project file naming convention) to a new location on your disk. If you want all the information in the additional files to travel with the project file, you can also copy the folder containing those files. However, the additional files are not needed. The CodeWarrior IDE can reconstruct a project's state when performing a Bring Up To Date or Make operation. In a revision control system, you would only check in the main project file and not the other files.
If your project file references other files via absolute Access Paths, you may need to modify those paths when you move the project. To learn how to do this, see "Access Paths" on page 323.
Refer to "Opening Project Files Created on Other Host Platforms" on page 69, for more information.
Importing and Exporting a Project

CodeWarrior lets you import and export a project file in extensible markup language (XML) format.
To export an open project file, choose Export Project from the File menu. A dialog box opens and prompts you to name the exported file.
Mac OS
You can choose to export the project file in Importable XML format or Text File List format. The latter format creates a plain-text listing of the project's text files.
To import an XML-formatted file, choose Import Project from the File menu. A dialog box opens for you to select a file to import. The IDE imports the selected file into a CodeWarrior project file, and then the IDE prompts you to save the project file.
 TIP
TIP
You should create a new folder in which to save the project file. This way, the IDE stores all files associated with the project in the same folder as the project file.
Controlling Debugging in a Project

Your program will probably not run correctly the first time you build it. In order to troubleshoot your program with the CodeWarrior debugger, you need to enable debugging information for your project and its files. This section tells you how to activate the debugging information.
The topics in this section are:
Activating Debugging for a Project

To enable debugging for a project, choose Enable Debugger from the Project Menu. The IDE configures the project's settings to produce debugging information automatically.
To learn how to manually configure debugging information for a project, refer to "Choosing Target Settings" on page 318.
Activating Debugging for a File

To generate debugging information for a source code file, click in the Debug column. The IDE displays a Debug Info marker in the column, as shown in Figure 3.29 on page 105. CodeWarrior automatically sets this marker as you add files to your project, unless you deselected the appropriate option in the project's Linker panel.
You can also use the Project Inspector window to enable or disable debugging information. See "Guided Tour of the Project Window" on page 42 for more information. When you add files to the project, the debug state matches the state of the Enable Debugger command, the debugger is disabled and debugging information is therefore disabled. When you see the Disable Debugger command, the debugger is enabled and automatically generates debugging information for the files you add to the project.
The Debug Info marker (Figure 3.29) indicates whether the IDE will generate debugging information for a file when building the project. Clicking a file's Debug Info marker removes it and disables debugging information for that file.
Whenever you change a Debug Info marker's status, the IDE marks the affected file for recompilation the next time your project is built.
You can generate Debug Info for all the files associated with the current build target. Shift/Option click in the Debug column to enable or disable debugging information for all of the files.
 NOTE
NOTE
Marking a source code file for debugging inclusion does not mean that the IDE creates a debugging file during the linking process. The Linker settings panel for the build target contains the options that affect whether CodeWarrior creates a debugging file.
Debug Info marker for groups
Debugging information for groups can be toggled on and off by clicking the Debug Info marker in the Debug column (Figure 3.29). The Debug column shows one of three markers for a group:
Figure 3.29 Debug Info markers
Adding Preprocessor Symbols to a Project

Sometimes you want to add your own symbol definitions to a project so that they are automatically included at the beginning of each source code file when the IDE builds the project.
An example of using your own symbols in the C or C++ language would be:
#define GLOBAL_DEBUG
Perhaps you want to define the GLOBAL_DEBUG symbol when building development versions of your code, but want to undefine it before shipping your final product.
To do this, you would create a precompiled header and insert the symbol definition into the header. See "Using Precompiled or Preprocessed Headers" on page 365 for more information.
To learn more about this topic, refer to the Inside CodeWarrior: C/C++ Tools and Inside CodeWarrior: Pascal Tools manuals.


Visit the Metrowerks website at: http://www.metrowerks.com
For assistance contact Metrowerks Technical Support at: support@metrowerks.com
Copyright © 1999, Metrowerks Corp. All rights reserved.
Last updated: May 24, 1999


 Items are currently sorted in ascending order.
 Items are currently sorted in descending order.


 NOTE
NOTE


 TIP
TIP

 WARNING!


 NOTE
NOTE
 TIP
TIP
 NOTE
NOTE
 WARNING!
 TIP
TIP


 NOTE
NOTE
 NOTE
NOTE
 NOTE
NOTE


 NOTE
NOTE

 NOTE
NOTE
 TIP
TIP
 WARNING!


 TIP
TIP
 NOTE
NOTE


 WARNING!
 TIP
TIP
 NOTE
NOTE


